Recent Articles

Job System – Part 1

For this article, I will make an introduction to the Unity Job System.

Firstly what is the Job System, and how does it work?

Job System basically is a Multi-threading system made by Unity to work with Threads in simple way inside of the games.

You can see more Infos here: https://docs.unity3d.com/Manual/JobSystem.html

Unity’s Job System has as its objective to generate more performance in your game, being able to generate great results, Unity Job System is better used with Burst Compiler, but you can use Job System separately.

For this Article, I will talk only about Job System.

So now Let’s go to talk about Unity Job System.

Today, the Job System has two ways of use, the first way (and the way used in this article) is the native way, to write this article, I am using Unity 2020.3.30 and He is available in this version (probably He also is available in other versions), another way, is using a package, that now (while I write this article) is in preview.

The Job System today only supports operations involving reference types, natively the value types don’t are supported (At the moment that I am writing this article).

To start, I need to talk that, Job System makes the use of Data Structures work, so all your functionalities used with the Job System, need to be inside a Struct that makes use of some Job Interface.

All data used in the job system is temporary. The Job System receives the values and manipulates, but your values cannot be copied for other variables outside of the Jobs, for making this, (Today) the unique way available is using NativeContainer, but this is a topic I talk about in another article.

How does this work?

Right after this, I can talk better about the Unity Job System.

To start you need to import the Namespace:

Unity.Jobs

or

UnityEngine.Jobs

What is the difference between them?

Unity.Jobs will permit that you make all operations with Job System (Except operations involving the Unity’s Transform component), and UnityEngine.Jobs will permit that you make the operations with transform.

After importing the namespace you need to create a data struct, this data struct needs to make use of some interface of JobSystem.

The interfaces of JobSystem are:

  • IJob (Unity.Jobs)
  • IJobFor (Unity.Jobs)
  • IJobParallelFor (Unity.Jobs)
  • IJobParallelForTransform (UnityEngine.Jobs)

For this article I will make a simple Job, with the IJob interface, all the Jobs Interfaces will implement a method named Execute.

Execute method is the main method of JobSystem, so your implementation needs to be made in him.

So here is our data struct:

struct UnityJobArticle : IJob
{
    public void Execute()
    {
        throw new System.NotImplementedException();
    }
}

Inside of the method Execute We will implement our action.

For example:

struct UnityJobArticle : IJob
{
    public int a;
    public int b;
    public int sum;

    public void Execute()
    {
        sum = a + b;
    }
}

Now, We will take about how to call a job.

To call a job we will need to do this process

Firstly We will create a variable of this struct as:

UnityJobArticle UnityJobArticleStruct;

After this, we will instantiate this variable in a method, for example:

void Start()
{
    UnityJobArticleStruct = new UnityJobArticle
    {
        a = 10,
        b = 10
    };
}

Repair that for this Case, I initialized a and b, but no sum, because for this case I will not need to give a value for sum because sum will receive the result of a plus b inside of the job, therefore your value is not important at this moment.

Now let’s talk about running the Job.

We have two ways to run the job, the first way is using a method named Run, this method makes your job be executed immediately.

Here is an example using the method Run:

void Start()
{
    UnityJobArticleStruct = new UnityJobArticle
    {
        a = 10,
        b = 10
    };

    UnityJobArticleStruct.Run();
}

More Infos about the method Run is available in Unity’s Documentation: https://docs.unity3d.com/2020.3/Documentation/ScriptReference/Unity.Jobs.IJobExtensions.Run.html

Our next way is using Job Scheduling.

What is Job Scheduling?

According to Unity’s documentation, the Job Scheduling will make that the Job is put in the Job Queue and run at an appropriate time.

For more Infos, you can see the Unity Documentation here: https://docs.unity3d.com/2020.3/Documentation/Manual/JobSystemSchedulingJobs.html

To make a Job Scheduling, we will need of a field of JobHandle.

What is the JobHandle?

The JobHandle is a struct used in JobSystem, She is returned when We schedule a Job, with it We can make some operations with your Job.

You can see more Infos in Unity Official Documentation: https://docs.unity3d.com/ScriptReference/Unity.Jobs.JobHandle.html

Scheduling a Job

For scheduling a job, firstly, We need of a field of type JobHandle, and after this, We will call the method Schedule, available in Job System.

So here is an example:

void Start()
{
    JobHandle UnityJobArticleHandle;
    UnityJobArticleStruct = new UnityJobArticle
    {
        a = 10,
        b = 10
    };

    UnityJobArticleHandle = UnityJobArticleStruct.Schedule();
}

When you make a Job Schedule you can call JobHandle.Complete, to force that your job will be completed, According to Unity’s documentation, when you call the JobHandle.Complete, the Job and your dependencies will priority on the execution.

Here is an example:

void Awake()
{
    UnityJobArticleStruct = new UnityJobArticle
    {
        a = 10,
        b = 10
    };

    UnityJobArticleHandle = UnityJobArticleStruct.Schedule();
    UnityJobArticleHandle.Complete();
}

For more Infos about the JobHandle.Complete you can see the documentation here: https://docs.unity3d.com/ScriptReference/Unity.Jobs.JobHandle.Complete.html

For Last here is an example source code:

using System.Collections;
using System.Collections.Generic;
using UnityEngine;
using Unity.Jobs;

public class JobExample : MonoBehaviour
{

    UnityJobArticle UnityJobArticleStruct;


    struct UnityJobArticle : IJob
    {

        public int a;
        public int b;
        public int sum;

        public void Execute()
        {
            sum = a + b;
            Debug.Log(sum);
        }
    }

    
    void Start()
    {

        JobHandle UnityJobArticleHandle;
        UnityJobArticleStruct = new UnityJobArticle
        {
            a = 10,
            b = 10
        };

        //UnityJobArticleStruct.Run();
        UnityJobArticleHandle = UnityJobArticleStruct.Schedule();
        UnityJobArticleHandle.Complete();

    }
    
}

For this article is this, in this article You understood the basics of the Job System, for the next articles of this series, I will continue talking about the Job System.

Follow me on Instagram to stay known when I create new posts.

You can also leave your feedback, and suggestion, I will read them all, and I will answer for you.

Thanks for reading.
Getting Time Data of Operational System

In this Article I will talk about how to get Time data of Operational System in your game.

Where can you use this?

You can use this content in games that make use of System Data infos for things such as set event times, give a bonus for daily login, etc.

For use the time in your game is very simple, you must use the namespace System of C#.

What is the System Namespace?

The Microsoft’s documentation say that: “ The System Namespace is responsible for contains reference’s data, and values used frequently, He also contains events, event handlers, interfaces, attributes and processing’s exception ”.
You can see more details in the link: https://docs.microsoft.com/en-us/dotnet/api/system?view=netstandard-2.0#fields .

To get the Time, We will use the field DateTime that is contained in the namespace System.

For this example I will get these data:

  • Current Data
  • Current Day
  • Current Hour
  • Current Minutes
  • Current Seconds
  • Current Milisseconds
  • Current Day of Week
  • Current Day of Year
  • Ticks
  • UTCNow

Once I get the data, I will show it in the Text Component.

Now before show the practical example, I will talk about the structure responsible for to get time data, that is the DateTime, it is responsible for work with the Time data.

In the DateTime struct We have some fields as:

– DateTime.Now
– DateTime.UtcNow
– DateTime.Today
– DateTime.Now.Hour
– DateTime.Now.Minute
– DateTime.Now.Second
– DateTime.Now.Miliseconds
– DateTime.Now.Ticks
– DateTime.Now.DayOfWeek
– DateTime.Now.DayOfYear

We also have the methods that will permit manipulating the files, but I will not talk about these methods in this article, because the focus of this article is to show how to get the time’s data of the operational system.

You can see more infos in the official documentation of C# by link: https://docs.microsoft.com/en-us/dotnet/api/system.datetime?view=netstandard-2.0#methods .

So let’s go for our implementation, this content is very simple to make the implementation, see this example.

public class GettingTime : MonoBehaviour
{

    public Text dateText;

    private void Update()
    {
        dateText.text = "Now: " + DateTime.Now + "\n" + "Utc Now: " + DateTime.UtcNow + "\n" +
                        "Today: " + DateTime.Today + "\n" + "Hours: " + DateTime.Now.Hour + " : " +  
                        "Minutes: " + DateTime.Now.Minute + " : " + "Seconds: " + DateTime.Now.Second + "\n" +
                        "Miliseconds: " + DateTime.Now.Millisecond + "\n" + "Ticks: " + DateTime.Now.Ticks + "\n" +
                        "Day of Week: " + DateTime.Now.DayOfWeek + "\n" + "Day of Year: " + DateTime.Now.DayOfYear;
    }

}

So, in this article We talk about how to Get data of the Operational System.

This project is available in my Github.

Follow-me on Instagram for stay knowing when I create new posts.

You can also leave your feedback, and your suggestion, I will read all, and I will answer for you.

Thank you for reading.

Acting in the Construction Of High Performance Applications For Mobile Platforms Using Unity Engine

This is a study, made as work of course’s final in my specialization, the study talk about good practices of game optimization in Unity Engine.
Currently this study is available only in portuguese, but in the future, it will to be translated for English.

Acknowledgment

Models and Textures Made By
Pulsar Bytes
Ebal Studios

Programming
Mauro Ubaldo

Guiding Teacher
Valéria Guerra

Recommended Hardware

Memory Storage Capacity 64GB.
RAM 4GB.
Processor Octa-Core (1.7GHz, 2.3GHz).
Operational System Android 11.

Notes
This game was developed has device target a Samsung Galaxy M21, if you don’t readed the Article, is very important know if, during the Study, the target device receipted a high load of stress because the study’s objective is made a optimized game, with the better possible quality, at a period of two months.


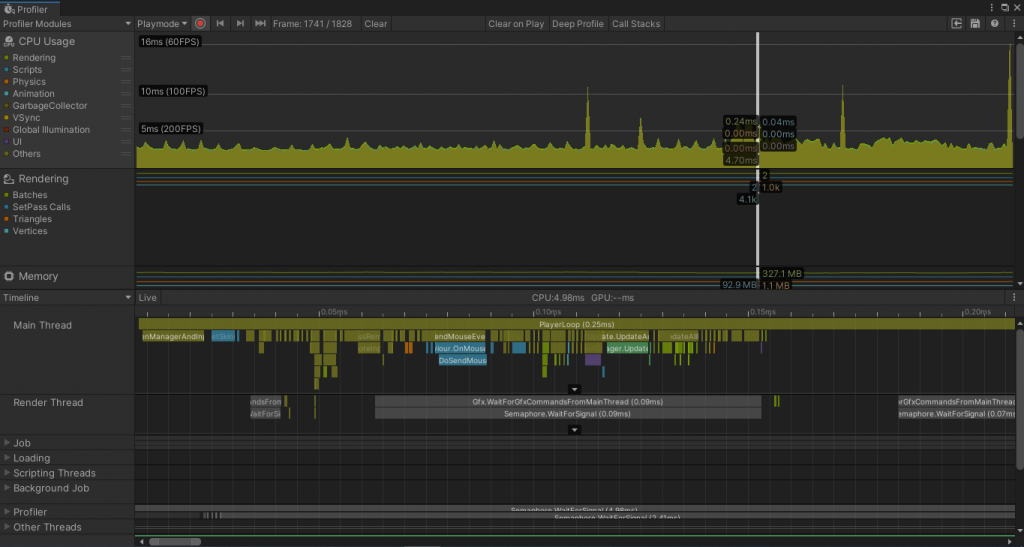
CPU Section

The CPU’s section is responsible for showing information about your use of the processor’s resources.

Firstly, it’s needed to understand that, this section has many graphics correspond to:

  • Rendering
  • Scripts
  • Physics
  • Animation
  • Garbage Collector
  • Vsync
  • Global Illumination
  • UI 
  • Others

When your project is running, if you select the CPU usage window, at the bottom side, are shown some information about your use of resources, the name of this section showed in bottom side, is Timeline, We will talk about this at this article don’t worry. (Informations showed in Timeline not is influenced by changes to colored boxes of left side).

You can change the exhibition of graphics by clicking in colored boxes at the left side of the screen, this will permit that you have a vision isolated of resources’s use by each section showed in profiler, but remember that, the use of CPU by your game is a combination of use of all sections.

So let’s go to the next step.

When We click on Timeline, Unity will show a menu with three options, that are: Timeline, Hierarchy and Raw Hierarchy.
We will talk about all the options, don’t worry.
Firstly let’s start with the timeline, and after We will advance for hierarchies.

Timeline

The timeline mode shows information about the resources’s use in all threads. Your information is shown by rectangles that represent the processes that are running and the time spent to complete each process.

For to simplify, how bigger the rectangle, bigger is the time in execution of a task, and bigger your costs of CPU, in this case you for optimize your game, you need reduce the rectangles for consequently reduce the execution’s time of tasks and gain more performance.

The CPU Impact directly in the FPS of your game, so is necessary a special caution. Remember that a process of optimization is constant and requires many analizes.

Now that we talked about Timeline Mode, let’s go to talk about Hierarchies.

Unity has two modes of hierarchies in profiler, they are: Hierarchy and Raw Hierarchy.

Hierarchy

The Unity’s Documentation says that: 

  • Hierarchy mode groups all information of processes.

You can see more details in documentation with this link: https://docs.unity3d.com/Manual/ProfilerCPU.html

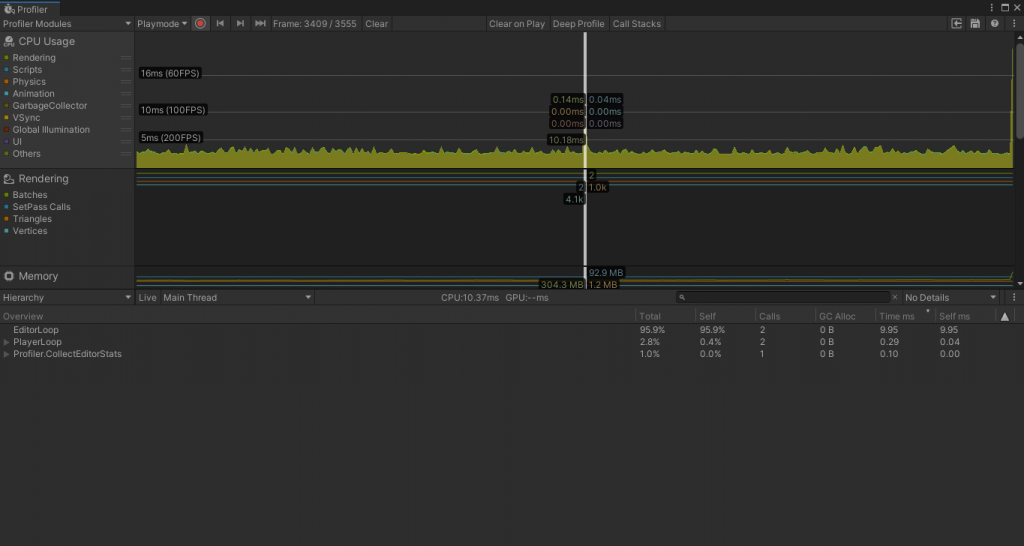
In hierarchy mode all infos about processes created are grouped as mentioned above. So it is not possible to have two EditorLoops, or two PlayerLoops. 

With hierarchy mode you can see in percentage the use of your resources, you also can see which process is using more CPU in percentage, this makes it easier to understand where is necessary to optimize. 

Is important note that EditorLoop and PlayerLoop contains an arrow of left side, this means that, They have hierarchies, openning these hierarchies, you can see the processes related to them, with your CPU’s use in percentage, in this way, is possible to monitor which processes is using more resources.

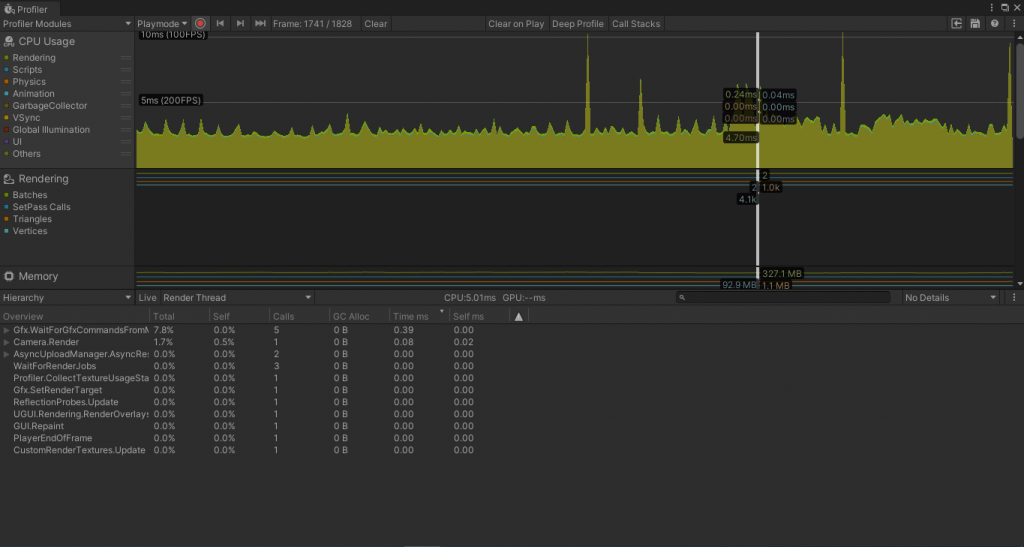
Also is possible to verify resource’s use in other threads besides the main, you only need click in Main Thread, after this, Unity will show a menu for you, in this menu you can select the thread, so Unity will show the process running at this thread.

You can see this in the example image.

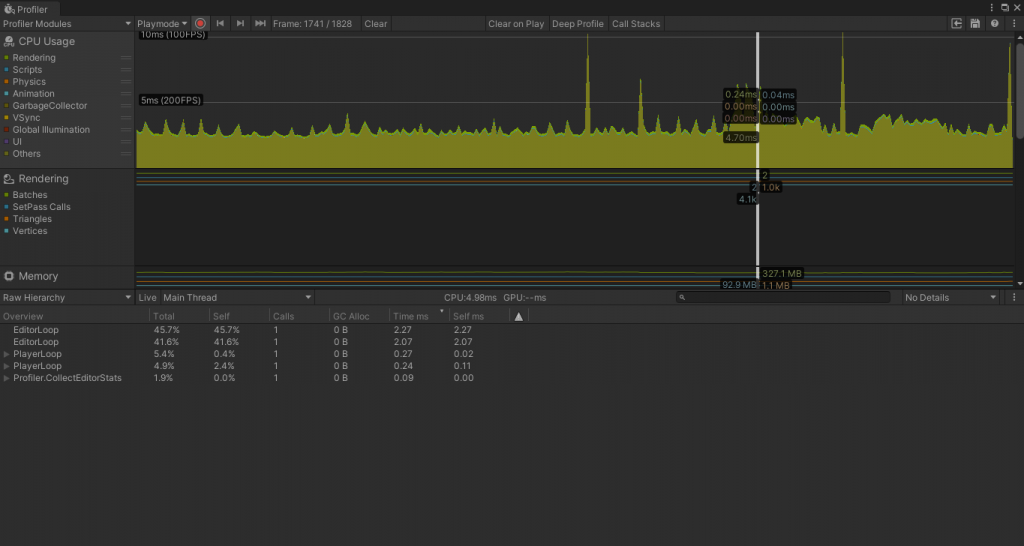
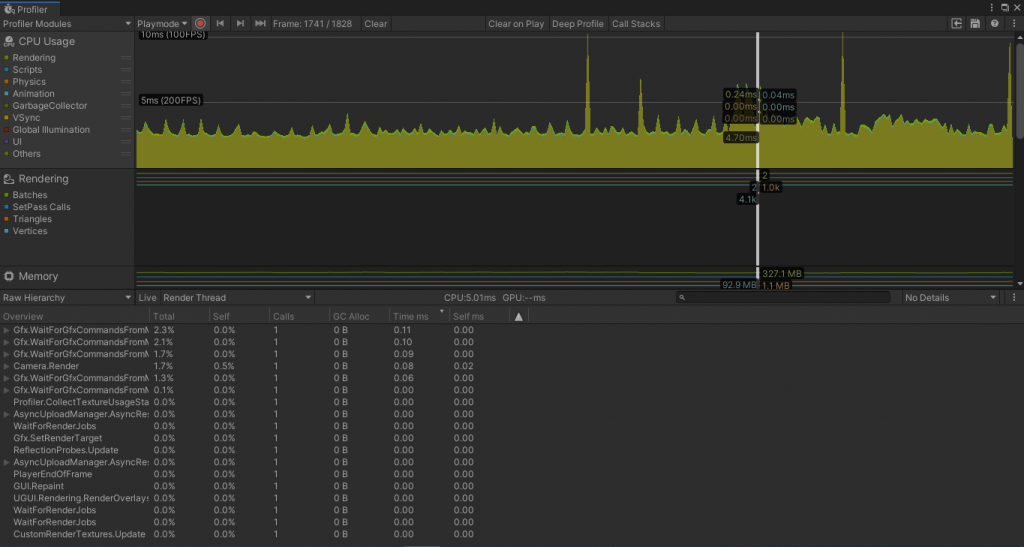
Hierarchy and Raw Hierarchy work in the same form, the difference is that, in Hierarchy the processes are grouped, while in Raw Hierarchy, groups are not created, so you can have repetitions of things as PlayerLoop, Editor Loop, and others.

You can see this in the image bellow.

Here also is possible verify another threads, as you can see in the next image.

MAKING CPU ANALYZING 

For to make a CPU analysis you must see the graphics of CPU usage constantly, is important analyze the maximum of informations possible, for this you can navigate in between graphics, these graphics will help you to find peaks where your CPU is more used, select these peaks and see the informations at bottom side, through of Timeline or Hierarchies, remember that, is very important analyze the time used for each task, and percentage of use of CPU, because with this you can identify problems easily, and consequently fix the problem more fast.

I recommend that this analysis be done with a frequency, because optimization is very important process.

So at this article you understand about the CPU section in profiler, you can see the Unity’s official documentation for more details by the link https://docs.unity3d.com/Manual/ProfilerCPU.html 

You can see my other articles about optimization, where I talk about Introduction to Optimization, and Memory Section Of Profiler.

Follow-me on Instagram for stay knowing when I create new posts.

You can also leave your feedback, and your suggestion, I will read all, and I will answer for you.

Thank you for reading.

Environment Triggers

For this article I will talk about Environment Triggers.

What is an Environment Trigger?

A environment trigger is an area that is placed in a scenario for execute an action when passes through a certain area.

For this article I will make two examples of the environment triggers, a for drop an object, and other for turn lights on and off.

So for our first trigger an object will dropped when your player enters the trigger area, done that this he will reposition the dropped object three seconds that the user exits the area.

using System.Collections;
using System.Collections.Generic;
using UnityEngine;

public class FirstTrigger : MonoBehaviour
{

    private bool playTimer;
    private float timer;

    public Rigidbody rigidbodyObjectThatWillDrop;
    public Transform transformObjectThatWillDrop;
    public Transform beginPositionOfObject;

    public float maxTimer;

    private void Update()
    {
        if (playTimer)
        {
            timer += Time.deltaTime;

            if (timer >= maxTimer)
            {
                timer = 0;
                playTimer = false;
                ResetPosition();
            }
        }
    }

    private void OnTriggerEnter(Collider other)
    {
        if (other.gameObject.CompareTag("Player"))
        {
            rigidbodyObjectThatWillDrop.useGravity = true;
            timer = 0;
        }
    }

    private void OnTriggerExit(Collider other)
    {
        if (other.gameObject.CompareTag("Player"))
            playTimer = true;
    }

    void ResetPosition()
    {
        rigidbodyObjectThatWillDrop.useGravity = false;
        transformObjectThatWillDrop.position = beginPositionOfObject.position;
    }

}

As you can see this is very simple, you only detect the enter and the exit of the player through the methods OnTriggerEnter and OnTriggerExit and after this, execute your actions.

Our Second Trigger will switch off the lights, when the user enters, and when the user exits the lights will to switch on.

using System.Collections;
using System.Collections.Generic;
using UnityEngine;

public class SecondTrigger : MonoBehaviour
{

    public Light[] environmentLights;

    private void OnTriggerEnter(Collider other)
    {
        if(other.gameObject.CompareTag("Player"))
        {
            for (int i = 0; i < environmentLights.Length; i++)
                environmentLights[i].enabled = false;
        }
    }

    private void OnTriggerExit(Collider other)
    {
        if (other.gameObject.CompareTag("Player"))
        {
            for (int i = 0; i < environmentLights.Length; i++)
                environmentLights[i].enabled = true;
        }
    }

}

How can we see environment triggers concept is very simple and through this concept you is able to create area interactions for your game.

You can see the environment assembly and source code through the project on Github.

Follow-me on Instagram for stay knowing when I create new posts.

You can also leave your feedback, and your suggestion, I will read all, and I will answer for you.

Thank you for reading.